TL;DR
Ford Transit accessories can protect cargo, organize tools, improve comfort, or support a camper build, but fitment and payload matter as much as features. Confirm your van’s model year, body style, wheelbase, roof height, load limits, and installation requirements before you buy.
A roof rack that clears one Ford Transit can hit the garage door on another. The difference may be a few inches of roof height or a rack designed for a different model year. That’s why the best Ford Transit accessories start with your van’s exact configuration, not a product photo.

Get business pricing on garage and car supplies
- Business-only prices and quantity discounts
- Tax-exempt purchasing
- Multiple users, one account, clear invoices
The right additions can turn a bare cargo van into a tidy mobile workshop, make long drives more comfortable, or give a camper conversion a place for every mug and sleeping bag. A floor liner might save hours of cleanup after a muddy job, while shelving can keep tools from clattering across the cargo bay at every turn. Small upgrades can make a big daily difference.
This guide helps you match accessories to your use, check fitment and payload, and plan for installation costs. You’ll also find a practical buying sequence and answers to common questions, so your next purchase makes your van more useful for work, travel, or everyday driving.
Choose accessories to fix a repeated work or travel problem, such as muddy floors, loose tools, or poor cargo lighting.
Confirm model year, body style, wheelbase, roof height, and configuration before ordering.
Count accessory and installation weight toward the van’s remaining payload.
Measure your finished roof height and check load limits before carrying ladders or mounting roof gear.
Use qualified help for unfamiliar wiring and safety-critical work, and keep cameras, sensors, lights, airbags, and exits clear.
Choose accessories around the work your van actually does
Ford Transit accessories work best when each one solves a problem you meet regularly, such as loose tools, muddy floors, awkward loading, or a long commute. Start with how you use the van: a delivery driver, electrician, weekend camper, and family shuttle will need different setups. A useful accessory makes a repeated task quicker, safer, or more comfortable, and the value adds up each time that task comes around.
For example, an electrician who spends the morning moving between jobs may get more from secure shelving, drawer units, and tie-down points than from a roof awning. Shelving reduces the time spent searching and can keep tools from becoming projectiles during a sudden stop; the tradeoff is added weight and less open floor space. A camper owner who parks near a trailhead may prefer window shades, ventilation, and modular storage. Modular pieces preserve flexibility, though they may be less secure or efficient than a fixed installation. Think about the sound of your tools knocking around at each turn, or the grit ground into an unprotected floor after a rainy day. Those details point to practical upgrades.
Make a short list of what slows you down or wears the interior. Group the problems into cargo protection, storage, exterior carrying, comfort, technology, or travel equipment. Then consider how often each problem occurs and what it costs in time, damage, or discomfort. This keeps the shopping list focused and helps you judge whether an upgrade is worth its full cost, including mounting hardware and installation. A van more useful for your routine usually beats one loaded with accessories you rarely touch.
One owner might find that a rubber cargo mat and four tie-down straps solve most of a messy-loading problem. Another, carrying small parts all day, may need labeled drawers and interior lighting. The best choice will depend on the job, your cargo, and how you use the space. Prioritize the upgrade that removes the most frequent friction, then reassess before adding equipment that uses the same space or payload.
Products Worth Considering

Chemical Guys 16-Piece Ceramic Car Wash and Protection Kit with Big Mouth Foam Cannon

DEWALT 20V MAX Cordless Drill and Impact Driver Combo Kit (DCK277D2)

Garmin Dash Cam 20 Standalone Driving Recorder
As an affiliate, we earn on qualifying purchases.
Protect the cargo bay before dirt and tools take over
Floor liners, wall panels, cargo mats, partitions, and tie-downs protect the van while keeping cargo under control. They help prevent scratches and dents, catch mud and spills, and stop equipment from sliding into the rear doors when you brake. For many working vans, these upgrades are a sensible first step because damage and cleanup accumulate: a small spill is easier to remove from a liner than from a bare floor, and repeated impacts can weaken or mark interior panels.
Picture a landscaper unloading damp bags of soil on a Tuesday and rinsing out the van on Friday. A washable floor liner makes that cleanup simpler, while wall panels take the scrapes from shovels and wheelbarrows. A partition can also keep loose cargo away from the cab, reducing the chance that tools or boxes reach occupants during hard braking. It’s like giving the van a work apron: the wear lands on a replaceable surface instead of the vehicle itself. The tradeoff is that liners and panels add weight and can cover factory access points, so check drainage, service access, and mounting before choosing a full-coverage kit.
Shelving and drawers bring another kind of protection: they give tools a home. But a cabinet that fits the cargo area can still be poorly placed for your routine. If you reach for drill bits twenty times a day, put them close to the side door; keep heavier equipment lower and secured. Lower storage helps limit the effect of a high center of gravity, while frequently used items near an opening reduce climbing and unloading. Rattling metal shelves may call for liners or dividers to keep small parts from bouncing around. Fixed cabinets are usually more secure, but removable bins can be easier to reconfigure when a job calls for bulky cargo.
Before ordering, check the product’s fitment for your model year, wheelbase, and body style. Confirm how it mounts, whether drilling is required, and whether it blocks access to spare equipment or emergency exits. Drilling can create a durable installation but may expose metal that needs proper corrosion protection; a no-drill mounting system may preserve the body but have different load limits. The total price should include fasteners and any fitting work, not just the mat or shelving unit.
Compare roof, hitch, and exterior gear before carrying more
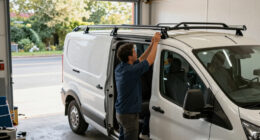
Roof racks, ladder racks, steps, awnings, tow bars, and hitch carriers expand what a Transit can carry, but every setup must match the van and the load. Check the product’s compatibility, its load rating, and the vehicle’s relevant limits before you plan a full load. The rack rating describes the accessory’s capacity; it does not override the vehicle’s roof, axle, or towing limits. Also factor in added height: a rack and ladder can change whether you fit under a car park barrier, while roof cargo can make loading harder and raise the van’s center of gravity.
Here’s a familiar scenario: a tradesperson straps a long ladder on the roof and drives into a low garage without accounting for the rack. A height label on the dashboard and a quick measurement of the finished van can help avoid expensive roof damage. Mud flaps and steps solve smaller but frequent problems: less spray along the body, or an easier climb into a high van. Steps can make repeated entry safer, though they may reduce ground clearance on uneven roads.
| Accessory | Useful when | Check before buying |
|---|---|---|
| Roof or ladder rack | You carry long or bulky gear | Roof configuration, load rating, and finished height |
| Awning | You work or camp outdoors | Mounting points, clearance, and wind guidance |
| Tow bar or hitch carrier | You need to tow or carry gear behind the van | Vehicle limits, wiring, carrier fit, and local rules |
| Steps or running boards | You enter and exit the van often | Body fit, ground clearance, and mounting method |
A hitch-mounted bike rack can be handy for a weekend trip, but the rack and bikes add weight and change the space behind the van. The rear load can affect handling and may obscure the view or access to the rear doors. Keep rear lights and the registration plate visible as local rules require. Check the manufacturer’s guidance for towing and carrying limits; the accessory’s own rating does not raise the vehicle’s limits. If you regularly switch between work and travel, a removable carrier can preserve access when it is not needed, though it adds the effort of fitting and storing it.
Keep comfort and technology upgrades practical
Seat covers, shades, organizers, lighting, cameras, and phone mounts can make daily driving easier, as long as they fit the vehicle and stay clear of safety equipment. The best comfort upgrades solve the irritations you notice repeatedly: sun glaring through the glass, paperwork sliding off the passenger seat, or dim light when you search for a tool after dusk. A small improvement can reduce repeated effort, but poorly placed accessories can make controls harder to reach or add visual clutter.
Imagine a courier finishing a late route in winter. A well-placed cargo light helps them find one last parcel without balancing a phone torch between their teeth. A seat cover may protect the upholstery from dusty work clothes, and a secure organizer can keep delivery notes within reach. Small changes can make a long shift feel less like a scramble. For lighting, consider whether the van needs broad cargo coverage or a focused work light; a bright point source may create glare and shadows rather than make the whole bay easier to use.
Technology needs extra care. A dash camera, auxiliary lights, parking sensors, or a camera upgrade may involve wiring or interact with existing vehicle systems. Poor placement can block a camera’s view, obscure a sensor, or leave wiring exposed. Keep airbags and their deployment paths clear, and follow the accessory maker’s fitting instructions. If an installation requires unfamiliar electrical work, ask a qualified installer to handle it. That cost can be worthwhile where incorrect wiring could drain the battery, interfere with vehicle electronics, or make a safety feature unreliable.
Put visibility and control first: an accessory should not block the driver’s view, a camera, a sensor, a light, or an airbag.
Before buying, check whether the product is made for your exact Transit configuration and whether installation could affect warranty coverage. Manufacturer terms vary, so read the vehicle and accessory documentation rather than assuming every aftermarket part has the same effect. If the van has an open safety recall, check it with the manufacturer or NHTSA before modifying affected equipment.
Plan a camper build around weight, power, and daily access
Camper accessories work as a system: insulation, window coverings, ventilation, storage, seats, and power all need to fit together. Start with the trips you actually take. A couple who camps on mild weekends may need a simpler setup than someone living in the van through cold months, where insulation and ventilation matter much more. Each decision affects the others: insulation can reduce interior space, storage can block airflow, and a larger battery can add meaningful weight while supporting more appliances.
Consider a weekend conversion with a bed platform, water container, fridge, and portable power station. Each item sounds manageable on its own, but together they use payload and floor space. Added weight reduces what remains for passengers, food, clothing, and trip gear; placing heavy items high or far behind an axle can also affect how the van handles. Weigh the completed van and keep it within the limits stated for that vehicle. A finished build should feel settled on the road, not packed like a moving closet. If the layout only works when the van is nearly empty, it may be too heavy or too bulky for the trips you plan to take.
Plan for access as well as storage. If a cabinet blocks a sliding door or covers a service point, a clever layout can become annoying fast. A swivel seat may open the living area, while window shades add privacy and help manage light. Ventilation can reduce stale air and condensation, but openings and equipment need a secure, suitable installation. In cold weather, ventilation still matters because occupants produce moisture; reducing airflow to retain heat can leave dampness inside fabrics and cabinets.
Electric Transit owners should pay close attention to weight, range, charging access, and model-specific fitment. Heavy conversion equipment can affect how far the van travels between charges, and a rack or accessory may need to preserve access to charging points. Power needs also shape the build: an auxiliary system can run a fridge or lights, but its battery, wiring, and charging equipment add cost and weight. Confirm current specifications with the vehicle and accessory manufacturers for your model year and market.
Use this five-step check before you place an order
A quick fit-and-cost check can prevent a wrong-size purchase or an installation surprise. Before ordering any Ford Transit accessory, write down your van’s model year, body style, wheelbase, roof height, and other relevant configuration details. Then compare those details with the seller’s fitment information and the manufacturer’s instructions. This matters because a product can be described as Transit-compatible while fitting only certain configurations, and a mismatch can mean wasted fitting time or an unsafe installation.
- Define the job. Name the problem the accessory should solve, such as protecting the floor or carrying a ladder. A specific goal makes it easier to compare products by useful features instead of appearance.
- Confirm fitment. Match the year, wheelbase, roof height, body style, and configuration. If the listing is incomplete, get written confirmation for your van before ordering.
- Check weight and limits. Include the accessory, mounting hardware, cargo, and passengers in your payload planning. Weight placed on the roof or rear can also affect handling and axle loads, so consider where it sits as well as the total.
- Plan installation. Find out whether fitting involves drilling, vehicle wiring, special tools, or professional work. Installation can change the total cost and may require additional corrosion protection or calibration.
- Calculate the full cost. Add hardware, installation, wiring, and any related upgrades to the purchase price. Comparing the complete installed cost helps show whether a cheaper accessory is still the better value.
For example, a buyer choosing a roof rack should check both the rack’s model fit and the van’s height after installation. Someone choosing a drawer system should include the unit’s weight and mounting hardware when thinking about payload. The accessory label alone cannot tell the whole story.
Keep the manufacturer’s installation guide and any weight ratings with your vehicle records. If the listing omits a fitment detail, ask the seller to confirm it against your van’s exact configuration before you buy. For a job involving high-voltage EV systems, airbags, or other safety-critical equipment, use a certified mechanic or appropriately qualified installer.
Frequently Asked Questions
How do I know which accessories fit my Ford Transit?
Match the accessory to your van’s model year, body style, wheelbase, roof height, and configuration. Ask the seller or manufacturer to confirm those details if the listing is unclear. A product that fits one Transit may not fit another.
What are the most useful accessories for a work van?
Many work vans benefit from floor protection, wall panels, shelving, drawers, tie-downs, and cargo lighting. Choose based on what you carry and what slows you down: a delivery driver may need quick-access storage, while a contractor may prioritize tool drawers and secure tie-downs.
How much weight can I add to my Transit?
The available payload depends on your specific vehicle and its equipment. Count passengers, cargo, conversion parts, accessories, and mounting hardware, then stay within the vehicle’s stated limits. Weighing a completed camper or heavily equipped van gives you a clearer answer than estimating from product descriptions.
Can I install a roof rack or ladder rack myself?
Some racks use straightforward mounting points; others need careful fitting or drilling. Follow the rack manufacturer’s instructions, check the roof configuration and load rating, and measure the van’s total height after installation. Get professional help if the work requires tools or skills you do not have.
Will an accessory interfere with cameras, sensors, or airbags?
It can if you place or wire it poorly. Keep accessories clear of cameras, sensors, lights, airbags, and emergency exits, and check vehicle guidance before changing wiring or adding electronics. Use a qualified installer when a job touches safety-critical equipment or high-voltage EV systems.
What should I check before adding a tow bar or hitch carrier?
Confirm that the equipment suits your van, then check the vehicle’s towing and carrying limits, wiring needs, and local requirements. The tow bar or carrier’s rating does not increase the Transit’s own limits. Check that the load will not block required lights or the registration plate.
Conclusion
Choose the accessory that solves a real, repeated problem, then confirm it fits your exact Transit and stays within its weight and installation limits. A sturdy mat, a well-placed drawer, or a properly measured rack can earn its place every workday.
Make one careful upgrade at a time. Your van should open like a well-organized toolbox, with what you need close at hand and nothing rattling loose on the road.