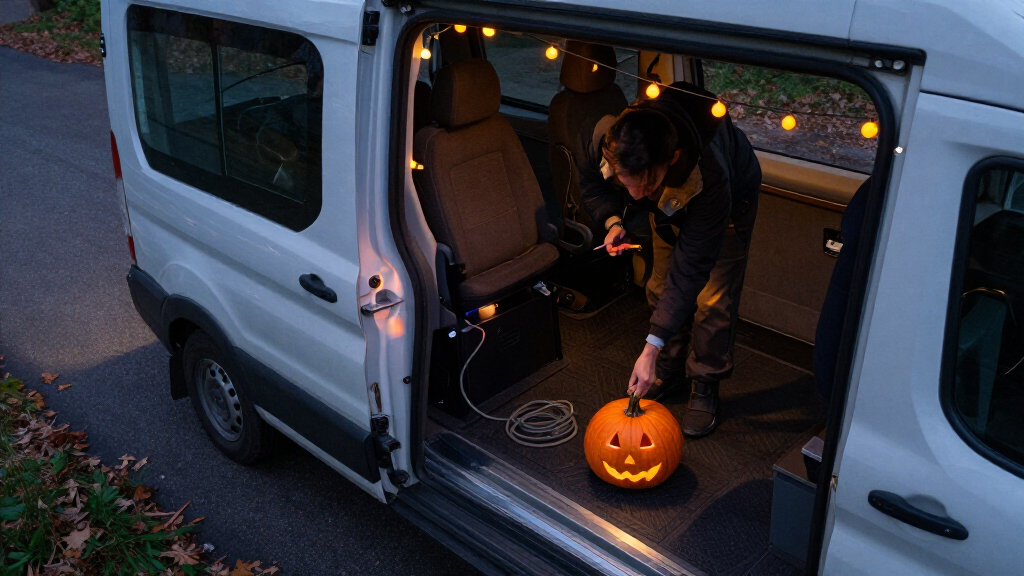

Decorate your Ford Transit for Halloween with removable accessories that suit its size and leave the driver’s view, lights, mirrors, doors, and safety equipment clear. This guide is for Transit owners who want a festive van for a parked display, a parade, or everyday driving. Allow 1–2 hours, depending on how many decorations you install.

Get business pricing on garage and car supplies
- Business-only prices and quantity discounts
- Tax-exempt purchasing
- Multiple users, one account, clear invoices

2PCS Car Fangs Halloween Car Decorations, Luminescent Fangs for Cars
- ✔ Material: PLA
- ✔ Color: White
- ✔ Dimensions, each: 3.54 x 2.55 x 0.98 inches
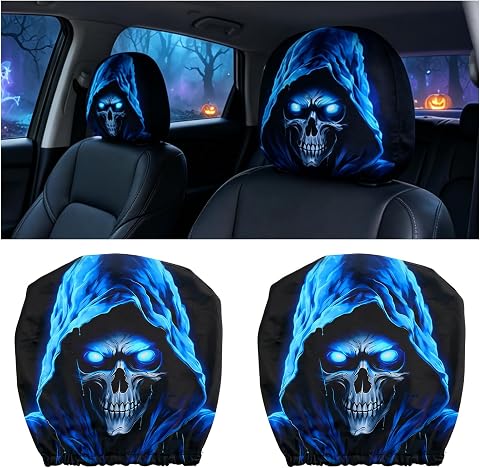
2-Pack Halloween Skull Headrest Covers for Cars
- ✔ Brand: BILEKSU
- ✔ Material: Polyester
- ✔ Color: Black + Blue

Scary Ghost Face Headrest Covers – Pack of 2
- ✔ Material: Polyester
- ✔ Color: Black
- ✔ Dimensions, each: 10.63 x 10.43 x 0.07 inches
Difficulty: Beginner | Time: 1-2 hours
What You’ll Need
Tools & Materials:
- Removable automotive vinyl decals or vehicle-safe magnets
- Battery-powered lights rated for outdoor use, if desired
- Soft microfiber cloths
- Automotive-safe cleaner
- Painter’s tape or low-tack masking tape
- Scissors and measuring tape
- Optional: soft fabric decorations and reusable ties
Knowledge:
- Basic cleaning and placement of removable decorations
- How to check the Transit’s lights, mirrors, windows, and doors before driving
Check your Transit’s owner’s manual and local vehicle rules before adding decorations. Use products labeled safe for automotive paint and outdoor use. Do not use open flames, candles, sharp attachments, or decorations that can detach in wind. Plan to remove or secure display-only items before driving.
2PCS Car Fangs Halloween Car Decorations, Luminescent Fangs for Cars
For a Transit that needs to read as Halloween-ready from outside, these glow-in-the-dark grille fangs are the most distinctive pick in this group. They absorb sunlight and glow afterward, bringing a nighttime effect that the skull and ghost headrest covers cannot provide. Each fang measures 3.54 by 2.55 by 0.98 inches, so the pair is a compact accent rather than a full-front decoration.The PLA pieces can be attached with the included double-sided tape or screws and expansion screws. That gives us a choice between a removable approach and a more fixed installation, though either method depends on a suitable grille surface. Compared with the tool-free headrest covers, these require more attention to placement and attachment. The surface is paintable for customization, but thick paint can weaken the glow, so a heavy color treatment may undermine the feature that makes this option stand out.This is our top pick for a visible exterior touch, with the clearest Halloween payoff after dark. It is also the least universal option in practical terms: the product is intended for a front grille, and the description does not confirm compatibility with a particular Transit grille design. We would check clearance, surface shape, and attachment points before installing.
Pros:
- Glow-in-the-dark effect creates a nighttime accent.
- PLA construction is described as weather-proof.
- Includes both adhesive and screw mounting materials.
- Paintable surface allows some customization.
Cons:
- Designed only for front grille installation.
- Thick paint may reduce the glow effect.
- Fit depends on the Transit grille and available mounting surface.
Best for: Transit owners who want a small, glow-in-the-dark Halloween accent on the front grille and can verify a suitable mounting surface.
Not ideal for: Buyers seeking an interior accessory, a guaranteed Transit-specific fit, or a decoration that installs without checking the grille and attachment method.
Bottom line: Choose the fangs for the lineup’s most visible exterior effect, provided your Transit grille can safely accommodate them.
“Choose the fangs for the lineup’s most visible exterior effect, provided your Transit grille can safely accommodate them.”
2-Pack Halloween Skull Headrest Covers for Cars
These skull covers make the most sense when we want the Transit cabin to feel decorated without changing anything on the exterior. Their black-and-blue skull graphic is described as high contrast, giving the interior a stronger visual statement than the ghost covers’ black design. At the same time, the polyester fabric helps shield headrests from oils and everyday wear, so the decoration has a practical job beyond Halloween.Installation is simple: elastic edges pull over standard headrests without tools, and the set includes two covers. Compared with the grille fangs, they avoid questions about exterior mounting and weather exposure. They also appear easier to remove and clean than a screw-mounted decoration. The tradeoff is that their compatibility is framed around most standard headrests, not every Transit configuration; oversized or unusual shapes may not fit well.We rank the skull set ahead of the ghost set for buyers who want the more conspicuous cabin design and upholstery protection together. But the limited black-and-blue color option narrows the look, and its styling may not suit someone after a classic white-sheet ghost feel or a coordinated all-black interior. Confirm the headrest dimensions before ordering, especially if the Transit has non-standard seats.
Pros:
- Tool-free elastic installation is quick.
- Two covers add a coordinated cabin accent.
- Machine washable for easier upkeep.
- Polyester helps protect headrests from oils and wear.
Cons:
- Only offered in black and blue.
- May not fit oversized or non-standard headrests.
- The product description does not confirm Transit-specific fit.
Best for: Transit owners who want washable interior protection and a high-contrast skull motif on standard-size headrests.
Not ideal for: Buyers with oversized or non-standard headrests, or anyone who wants a different color scheme or an exterior-facing decoration.
Bottom line: Pick the skull covers when washable protection and a bold cabin design matter more than exterior visibility or color choice.
“Pick the skull covers when washable protection and a bold cabin design matter more than exterior visibility or color choice.”
Scary Ghost Face Headrest Covers – Pack of 2
The ghost-face covers are the easiest starting point for a low-effort Halloween cabin refresh. They pull over standard headrests without tools and are described as taking under a minute to install. Their creepy smiling ghost graphic gives the cabin a playful seasonal cue, while the polyester fabric covers the headrest surface against dirt, oils, and wear.Compared with the skull covers, this set uses a black design rather than the skull option’s black-and-blue palette, and each cover is slightly larger at 10.63 by 10.43 inches. That extra listed width does not guarantee a better fit, however; the description still cautions that very large or non-standard headrests may be loose. Both sets are machine washable and tool-free, so the distinction is chiefly visual rather than a major installation advantage.We place this third because its appeal is more specific to buyers who prefer a ghost motif, while the skull covers pair their graphic with a stated high-contrast look and the fangs deliver the lineup’s only exterior effect. The ghost set remains a sensible choice if you want a simple, reversible interior decoration. Check the headrest shape and dimensions first, and keep expectations centered on standard headrests rather than a confirmed Transit fit.
Pros:
- Pull-on installation requires no tools.
- Includes two matching covers.
- Machine-washable, fade-resistant polyester.
- Covers headrests against dirt, oils, and wear.
Cons:
- May fit loosely on very large or non-standard headrests.
- The black design may be less visually varied than the skull set.
- No Transit-specific fit is stated.
Best for: Transit owners who want a playful, removable Halloween look inside the cabin and have standard-size headrests.
Not ideal for: Buyers who want an exterior accent, a skull design, or a confirmed fit for oversized and non-standard Transit headrests.
Bottom line: Choose the ghost covers for an easy, playful interior change when their graphic suits your taste and your headrests are standard-sized.
“Choose the ghost covers for an easy, playful interior change when their graphic suits your taste and your headrests are standard-sized.”
As an Amazon Associate we earn from qualifying purchases.
Before You Start
Park on a level surface away from traffic, switch off the engine, and let hot body panels cool. Check the weather: avoid applying decals to wet, dusty, or very cold panels, and do not decorate in strong wind. Decide whether the van will be driven or shown while parked; driving requires a much more restrained setup.
Keep the windshield, front side windows, mirrors, cameras, sensors, headlights, tail lights, turn signals, reflectors, license plates, and door handles unobstructed. Do not attach anything to the grille, exhaust, wheels, or areas that become hot. Avoid placing decorations near airbags or inside the driver’s field of view.
Step-by-Step Instructions
Step 1: Choose a Halloween theme
Pick one simple theme that works with the Transit’s large, flat panels, such as a friendly ghost van, a pumpkin delivery van, or a bat-covered night van. Choose two or three colors and list the decorations you need. Favor lightweight decals, paint-safe magnets, and battery-powered lights over bulky props.
Tip: For a van that will be driven, plan for decorations to sit flat against the body. Save loose fabric, oversized props, and projecting pieces for a stationary display.
Check: You have a short materials list and a clear distinction between decorations suitable for driving and those for a parked display.
Step 2: Map safe decoration zones
Walk around the van and identify clear areas on the side panels, rear doors, and other bodywork away from lights, windows, handles, sensors, and cameras. Mark the intended edges temporarily with painter’s tape. Sit in the driver’s seat and check that the planned design does not enter your view through the windshield or side windows.
Tip: Transit roof height and body layouts vary. Check your own van rather than relying on a decoration layout made for another model or wheelbase.
Check: The design fits the van’s body panels, and every light, plate, mirror, camera, sensor, window, and door handle remains clear.
Step 3: Clean and dry the panels
Wash the areas where decorations will go with automotive-safe cleaner, then dry them with a clean microfiber cloth. Remove grit, waxy residue, and moisture so decals or magnets can sit evenly. Test the cleaner and one decoration on a small, hidden area first.
Tip: Do not scrub with abrasive pads or use household solvents; they can scratch or damage the finish. Follow the decoration maker’s temperature and application directions.
Check: The application areas are dry and free of dust, and the test decoration does not visibly affect the paint.
Step 4: Apply flat decorations
Position each decal or magnet on the marked panel, starting with larger pieces and leaving enough space around doors and panel seams. Apply decals gradually from one edge, smoothing toward the other edge with a clean cloth to push out trapped air. Place magnets flat against clean metal and press around the full edge.
Tip: Magnets do not attach to every body panel. Confirm the surface is magnetic, and remove and clean beneath magnets regularly to prevent trapped grit from rubbing the paint.
Check: Each piece lies flat without lifted corners, bubbles, or sharp edges that could catch the wind.
Step 5: Add lights for a parked display
Use outdoor-rated, battery-powered lights only when the Transit is parked. Attach them with soft, removable ties or clips made for vehicle use, keeping wires away from doors, hinges, wheels, exhaust, and hot surfaces. Secure the battery pack where it stays dry and accessible, and switch the lights off before driving.
Tip: Do not run cords through a closed door or window; they can be pinched or interfere with a seal. Avoid flashing patterns that could distract drivers or be restricted by local rules.
Check: The lights work, their wiring is secured and protected from pinching, and no light or cord blocks a vehicle light or safety feature.
Step 6: Inspect the whole van
Walk around the Transit and gently tug each decoration to check its hold. Open and close every door, including the sliding door and rear doors, and confirm nothing catches or blocks a handle. Switch on the headlights, brake lights, hazard lights, and turn signals, then check them from outside.
Tip: Ask another person to check the van from the driver’s seat and from behind while you inspect the decorations.
Check: All doors operate normally, every required light is visible, and decorations remain firmly attached.
Step 7: Separate the driving setup from the display setup
Before driving, remove any loose, hanging, protruding, or lighted display pieces. Confirm that the windshield, windows, mirrors, lights, plates, cameras, and sensors remain unobstructed. Drive slowly at first in a safe area and stop to recheck the decorations if you hear flapping or notice movement.
Tip: If a decoration starts lifting or shifts during the drive, pull over somewhere safe and remove it. Do not reach outside or adjust it while the van is moving.
Check: The Transit is road-ready, with only low-profile, securely attached decorations that do not affect visibility or vehicle operation.
Step 8: Remove decorations after Halloween
Remove lights, ties, magnets, and decals according to their product directions. Peel decals slowly at the recommended temperature; use only a paint-safe adhesive remover if residue remains, testing it on a hidden area first. Clean and dry the panels afterward, and store reusable accessories in a clean, dry container.
Tip: Do not yank decals off quickly or use a blade against the paint. If an adhesive will not release, follow the product maker’s removal instructions.
Check: The panels are clean and free of visible residue, and the paint shows no new marks.
Common Mistakes to Avoid
- Covering a light, license plate, mirror, camera, sensor, or window with a decoration. — Map the van’s safety features before decorating and inspect them again from the driver’s seat and outside.
- Using household tape, untested adhesive, or a magnet over dirt. — Choose vehicle-safe products, clean the surface, and test a hidden spot before applying decorations broadly.
- Driving with loose fabric, dangling lights, or bulky props attached. — Keep the driving setup low-profile and secure; remove display-only items before moving the van.
- Applying decals to wet, dirty, or hot panels. — Work with cool, clean, dry bodywork and follow the product’s temperature guidance.
Troubleshooting
Problem: A decal corner lifts after application.
Solution: Park the van, clean and dry the area, and press the edge back down if the product allows reuse. Replace the decal if it will not lie flat; do not drive with an edge catching the wind.
Problem: A magnet slides or will not stick.
Solution: Remove it and clean both surfaces. Check that the panel is magnetic and dry. Move the decoration to a flat steel panel or use an automotive decal designed for that surface.
Problem: Adhesive residue remains after removal.
Solution: Use the product maker’s recommended paint-safe remover and a soft cloth, testing a hidden spot first. Avoid scraping with metal or using strong solvents.
Problem: A light string flickers or stops working.
Solution: Switch it off, check the battery pack and connections, and replace damaged outdoor-rated lights. Do not use lights with exposed wiring or keep them installed in wet conditions if their rating does not allow it.
What Success Looks Like
The finished Transit has a clear Halloween theme, with decorations attached securely to clean body panels. The driver has an unobstructed view, all doors and safety features work normally, and every required light and license plate remains visible. Display-only lights and loose props are removed before driving. After decoration removal, the body panels are clean and undamaged.
Next Steps
Photograph the finished van while it is parked, then switch off and remove display lights before driving. After Halloween, take down the accessories, clean the panels, and store reusable items dry and flat. Before using decals or magnets again, inspect them for cracked edges, damaged wiring, or trapped grit.
Frequently Asked Questions
Can I drive a Ford Transit with Halloween decorations?
Yes, if the decorations are securely attached, low-profile, and do not obstruct the driver’s view, lights, mirrors, plates, cameras, sensors, doors, or other safety equipment. Check local vehicle rules and remove anything loose or projecting before driving.
Will magnets stick to every Ford Transit panel?
No. Body materials and panel construction can vary. Test a magnet on the exact panel you plan to decorate; use a vehicle-safe decal on surfaces where it does not hold.
How can I avoid damaging the paint with Halloween decals?
Use decals labeled for automotive paint, apply them to clean and dry panels, and test a hidden spot first. Follow the maker’s temperature and removal directions, and peel slowly rather than pulling sharply.
Can I leave Halloween lights on while driving?
Use decorative lights for a parked display. Switch them off and remove or secure their wiring before driving, and never let them obscure required vehicle lights or distract other road users.
Fall Picks
fall essentials
As an affiliate, we earn on qualifying purchases.