
To set up your camper’s plumbing, start by choosing and positioning your fresh, grey, and black water tanks for balance and easy access. Use durable, flexible tubing suitable for potable water, routing it efficiently to reduce pressure loss. Incorporate solar-powered pumps and valves for independence from external power sources. Insulate pipes and electrical components to prevent freezing and condensation. Properly securing all connections guarantees a leak-free system, and with the right setup, you’ll be prepared for any adventure. Keep going to discover more helpful tips.
Key Takeaways
- Select and position fresh, grey, and black water tanks for balanced weight and easy access.
- Use durable, flexible tubing designed for potable water to connect tanks to fixtures.
- Route water lines directly with minimal bends to reduce pressure loss and ensure smooth flow.
- Incorporate insulation around pipes and tanks to prevent freezing and maintain water temperature.
- Test the system thoroughly for leaks, pump operation, and insulation effectiveness before traveling.

Are you unsure where to start with camper plumbing? Setting up your water tanks and lines might seem overwhelming at first, but with a clear plan, you’ll have it running smoothly in no time. One of the best ways to guarantee your system is efficient is by considering how solar power can support your water needs. Solar panels can power small pumps or electric valves, reducing the need for external power sources and making your camper more self-sufficient. This setup is especially useful if you plan to boondock or stay off-grid for extended periods. Before diving into the plumbing layout, think about insulation techniques that can keep your water lines from freezing in cold weather. Proper insulation not only prevents burst pipes but also helps maintain water temperature, which is vital if you’re using heated water or planning winter trips.
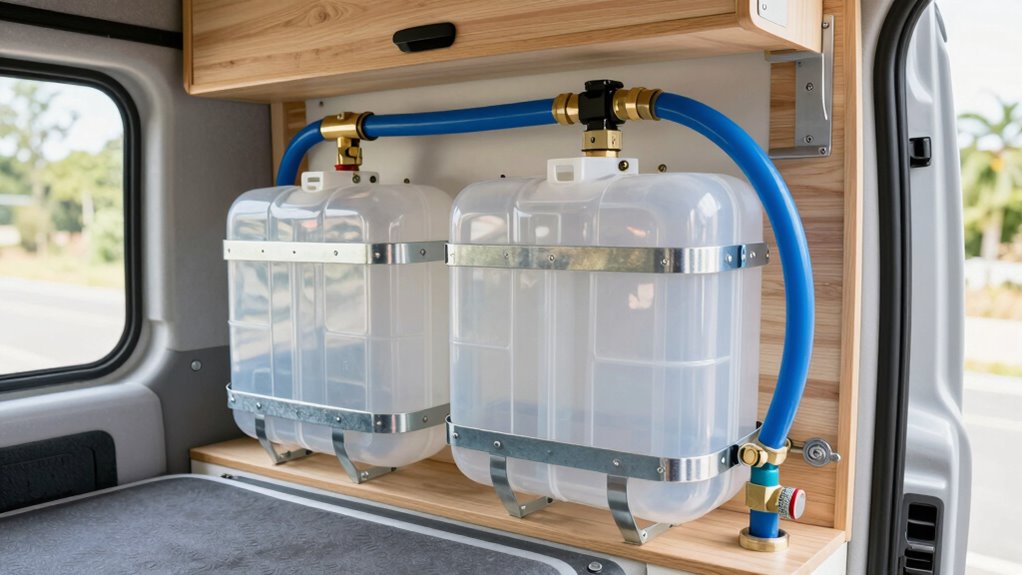
Start by choosing the right water tanks. Typically, you’ll want a fresh water tank, a grey water tank to collect used water, and potentially a black water tank if your camper has a toilet. Position these tanks in a way that keeps their weight balanced and accessible for refilling and maintenance. When installing your water lines, use durable, flexible tubing designed for potable water. Secure all connections tightly to prevent leaks, and consider routing your lines through insulated areas or wrapping them with foam pipe insulation. This step is especially important if you’re in colder climates, where uninsulated lines can freeze and cause costly damage. Remember, the route of your lines should be as direct as possible to minimize pressure loss and maximize flow efficiency. Additionally, understanding deep-sky imaging principles can inspire you to design your camper’s layout with optimal space and accessibility in mind. Incorporating high-quality plumbing materials can further ensure your setup’s durability and longevity.
As you set up your water system, integrate your solar power setup to operate any pumps or electronic valves. Solar-powered pumps are energy-efficient and quiet, offering a sustainable way to manage water flow without relying on your camper’s battery or shore power. When planning your electrical connections, guarantee your wiring is protected from moisture and temperature fluctuations. Proper insulation techniques should extend to your water lines and electrical components, creating a barrier against frost and condensation. Incorporating precious metal IRAs in your planning can serve as an analogy for ensuring your system’s longevity and resilience through high-quality materials and thoughtful design. Using proper plumbing materials can significantly enhance the durability of your setup and prevent future issues. Proper insulation and solar power integration work together to make your camper plumbing more reliable and eco-friendly, allowing you to enjoy your adventures without constantly worrying about power or water issues.
Finally, test your entire system thoroughly before hitting the road. Check for leaks, ensure your pumps operate correctly, and verify that your insulation is effective. With these steps, you’ll have a resilient, efficient camper plumbing setup that works seamlessly whether you’re parked in warm weather or battling cold nights.
Frequently Asked Questions
How Do I Prevent Water Line Freezing in Winter?
To prevent water line freezing in winter, you should insulate your pipes with winter insulation, especially in exposed areas. Installing pipe heating cables offers extra protection by keeping the lines warm. Additionally, keep cabinet doors open to allow warm air circulation and let faucets drip slightly during extremely cold nights. These steps help maintain water flow and prevent freezing, ensuring your camper’s plumbing stays functional throughout winter.
What Are the Best Materials for Camper Water Lines?
You should use PEX or reinforced flexible hoses for camper water lines, as they resist freezing and are easy to install. These materials work well with durable pipe fittings, ensuring leak-proof connections. Incorporate water filtration to keep your system clean and protect against debris. Avoid rigid plastic pipes, which are more prone to cracking in cold weather. Opt for these flexible, reliable materials to keep your camper’s water system running smoothly.
How Often Should I Sanitize My Camper Water System?
An ounce of prevention is worth a pound of cure, and that’s especially true for your camper’s water system. You should sanitize your camper water system at least once every three months or more often if you notice any odors or discoloration. Follow proper sanitizing procedures, including water filtration steps, to keep your system clean and safe. Regular maintenance guarantees fresh water and peace of mind on your adventures.
Can I Install a Water Heater in My Camper?
Yes, you can install a water heater in your camper. A portable shower often benefits from a water heater, making showers more comfortable. For water heater installation, make certain you choose a unit compatible with your camper’s space and plumbing system. Follow the manufacturer’s instructions carefully, and consider professional help if needed. A properly installed water heater enhances your camping experience with hot water on demand.
What Is the Typical Lifespan of Camper Water Tanks?
Imagine your adventures filled with worry-free hydration; most camper water tanks, depending on their water tank materials, typically last 5 to 15 years. The lifespan of water tanks varies based on factors like material quality and maintenance. Regular inspections and proper care help extend their life, ensuring you stay refreshed and worry-free on the road. With proper upkeep, your water tank can serve you well for many memorable journeys.
Conclusion
Now that you understand how to set up water tanks and lines, you’re ready to keep your camper comfortably flowing. Imagine a weekend trip where your newly installed system works flawlessly—water flows smoothly from the tank to the faucet, making dishes and rinsing easy. With these basics in place, you can confidently enjoy your adventures, knowing your plumbing is reliable. Just remember to regularly check for leaks and maintain your system for stress-free travels.